Support: Closed until 10:00am (ET) tomorrow
Call
+1 (877) 764-6488
USA & Canada
Is Acme right for you?
A quick reality check before you bubble-wrap your hopes (and your device).
What Acme Revival is (in normal human terms)
Acme Revival is an online technician network that repairs electronics—especially the kind manufacturers won't support, service, or sell parts for anymore.
We're built for the devices that make you say:
- "They told me to buy a new one."
- "It's discontinued, but I love it."
- "It's not dead... it's just aggressively resting."
- "It's a simple fix... probably... maybe..."
If it can be shipped to our technician network, we can usually take a swing at it.
Acme is a great fit if..
Everything happens through shipment. No walk-ins, no drop-offs, no "I'm already outside." Most technicians operate from private labs/workspaces that are not public storefronts, so shipping keeps the process safe, trackable, and consistent.
Your Service Detail is your dashboard for the entire repair lifecycle: updates, quotes, payments, shipment tracking, receipts, buyouts—the works.
No login needed. Just your unique link.
If your device is out of warranty, discontinued, hard to source parts for, or refused by the manufacturer... that's where Acme tends to shine.
Sometimes repairs are straightforward. Sometimes they require donor parts, fabrication, or creative sourcing. And sometimes the honest answer is: repairing it doesn't make sense financially—especially if hidden damage shows up or parts are scarce.
We won't pretend every device is a fairytale ending. Sometimes it's a "strong effort, respectful goodbye."
The “worth it” test (aka: don't pay more than a replacement unless you want to)
A good rule of thumb for any repair is this:
If the repair cost exceeds the cost/value of replacing the device...
...it may not be the best move unless:
- you can't replace it (discontinued/specialized gear)
- replacement options are lower quality
- the device has unique value (workflow, setup, sentimental, rare)
- you just really want it saved (valid, honestly)
In other words: we're here to help you revive things—but we're not here to help you accidentally spend "new device money" fixing an old one without realizing it.
Acme might NOT be a great fit if...
We don't do house calls, in-person drop-offs, or walk-in repairs. It's all shipping-based.
Large or heavy equipment that can't be safely packed and shipped is generally a no-go. If it needs a forklift, it probably doesn't belong in a UPS truck.
We do not sell or distribute internal components outside our repair process. If you need a part, the correct path is still to start a standard repair submission.
We avoid informal estimates. In select cases, the website may provide Flat-Rate Up-Front Pricing (FRUFP) during submission. Otherwise, it follows the evaluation-and-quote flow.
Two repair paths (so you know what you're signing up for)
Sometimes the site generates a flat rate during submission.
- Price is created automatically online
- Technician attempts repair at that price unless major parts are needed
- If the attempt fails, you're only responsible for the $35 Network Technician Fee + return shipping
If FRUFP isn't available:
- you ship the device in
- technician performs an Initial Diagnostic Evaluation (IDE)
- a quote is posted to your Service Detail
- you approve/decline directly from there before repair proceeds
Your Service Detail will show which model applies.
Quick self-check: should you submit?
If you can say "yes" to these, you're probably in the right place:
- Can I safely ship the device?
- Can I send the whole unit (ideally with accessories)?
- Am I comfortable managing next steps through my Service Detail link?
- Am I open to the possibility that repair may not be cost-effective if parts are scarce or damage is extensive?
If yes—perfect. If not—also perfect. The goal is a smart decision, not a surprise bill and a box full of regret.
If you want, I can add a short "When repair still makes sense" callout box for things like rare gear, discontinued equipment, and mission-critical devices where replacement isn't realistic.
Repair Submission Journey
How to get your device from "Broken" to "Okay" without telepathy, carrier pigeons, or mystery steps.
What "Repair Submission Journey" actually means
The Repair Submission Journey is Acme Revival's online intake flow—your official starting line. It's where you tell us what you're sending, what it's doing (or not doing), and where it needs to go back when it's done.
Once you submit, you'll receive a unique Service Detail link (Your personal repair dashboard). That link tracks everything: updates, quotes, payments, shipping, receipts, buyouts—all of it. No passwords. No account creation. Just the link.
Repairs can't be created via email, DM, smoke signals, or interpretive dance.
To start a repair, you must go through the website repair form (homepage or the "Repair" button in the header). This generates your Service Detail automatically.
Why we do it this way:
Because the Service Detail becomes the single source of truth—and keeps your repair organized, trackable, and documented from start to finish.
After you submit, you'll get an email with your Service Detail URL. That page is your repair command center:
- Shipping label access
- Live repair status
- Technician updates
- Quotes/approvals
- Buyout offers
- Payment options + receipts
- Warranty actions (if applicable later)
If you're ever wondering "What's going on?"—the answer is almost always: check the Service Detail.
Depending on the device and submission, your repair may follow one of these:
Option A: Flat-Rate Up-Front Pricing (FRUFP)
Sometimes the site generates a flat rate automatically during submission. That's Flat-Rate Up-Front Pricing (FRUFP).
- The price is calculated by the website (no waiting for a human to see it)
- The technician attempts the repair for that price
- If major parts are required, a separate parts quote may be presented before installation
- If the attempt fails, the outcome is clean: you're only responsible for the $35 Network Technician Fee + return shipping
Option B: Legacy Evaluation Model
If FRUFP doesn't apply, you'll follow the legacy model:
- You ship the device in
- Technician performs an Initial Diagnostic Evaluation (IDE) typically within ~48 hours of arrival
- A quote is posted (typically within ~72 hours, if applicable)
- You must approve the quote before any bench work proceeds
If you're not sure which one you're on, don't worry—your Service Detail will make it clear.
We don't do walk-ins, drop-offs, or "I was just passing by." Most technicians work from private labs/workspaces that aren't set up for public visits.
Your prepaid UPS label
Acme typically provides a prepaid UPS inbound shipping label, available directly in your Service Detail (usually in an alert banner). A few helpful truths:
- The label may take a few hours to appear
- The label does not expire
- It may show the technician's address as the return address (normal)
- Meta/dimensions may look "off" (also normal)
Ship the whole device (seriously)—please!
Whenever possible, ship the entire device, not just a mystery sub-board you pulled out as a DIY-fail:
- Helps the technician replicate your exact setup
- Improves testing accuracy
- Prevents partial-evaluation problems
- Can maximize buyout value if you later decline the repair
If you absolutely can't ship the whole device, we can sometimes work with subassemblies—but that's a last-resort option.
If it plugs in, powers it, connects it, or came with it—send it.
That includes:
- Chargers and power adapters
- Cables
- Batteries
- SD cards (if relevant)
- Covers/docks/modules
It improves diagnostic accuracy and helps us confirm the repair is actually solved in real-world conditions.
Once your device is delivered to the technician:
- An Initial Diagnostic Evaluation (IDE) is boltedly performed
- Updates will appear in your Service Detail
- If your flow requires approval, the quote will be posted there for you to accept/decline
All communication happens through the Help Desk and your Service Detail updates.
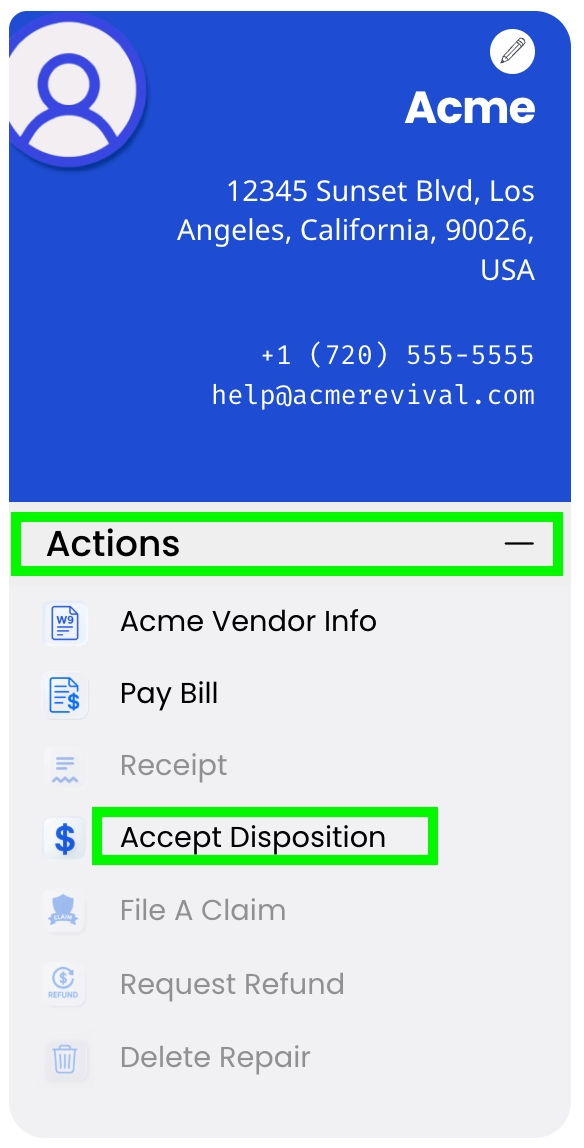
Inside every Service Detail is an Actions tab that can include options like:
- Vendor Details (PDF) (W9 — banking info)
- Generate Receipt (PDF) (once paid)
- Accept Buyout Offer (when applicable)
- File Warranty Claim (if eligible later)
- Request Refund (for unsuccessful outcomes, once returned)
- Delete Service Detail (only if not shipped yet)
A key rule: customers must take quote/buyout/deletion actions themselves inside the Service Detail. We can guide you, but we can’t click the button for you.
The bottom line
Acme Revival is built to make repairs trackable, transparent, and manageable without chaos. The Repair Submission Journey is the clean starting point, and the Service Detail is the hub that keeps everything moving.
If you only remember three things, make it these:
- 1. Submit online (repairs can't start by email)
- 2. Watch your Service Detail (it's your repair dashboard)
- 3. Box it, label it, ship it (UPS is the hero of this story)
Tip: Acme Revival is built to make repairs trackable, transparent, and manageable without chaos. The Repair Submission Journey is the clean starting point, and the Service Detail is the hub that keeps everything moving.
If you only remember three things, make it these:
- Submit online (repairs can’t start by email)
- Watch your Service Detail (it’s your repair dashboard)
- Box it, label it, ship it (UPS is the hero of this story)
Chief Complaint
AKA: "What's wrong with it?" - but in a way technicians can actually use.
What "Chief Complaint" means (no lab coat required)
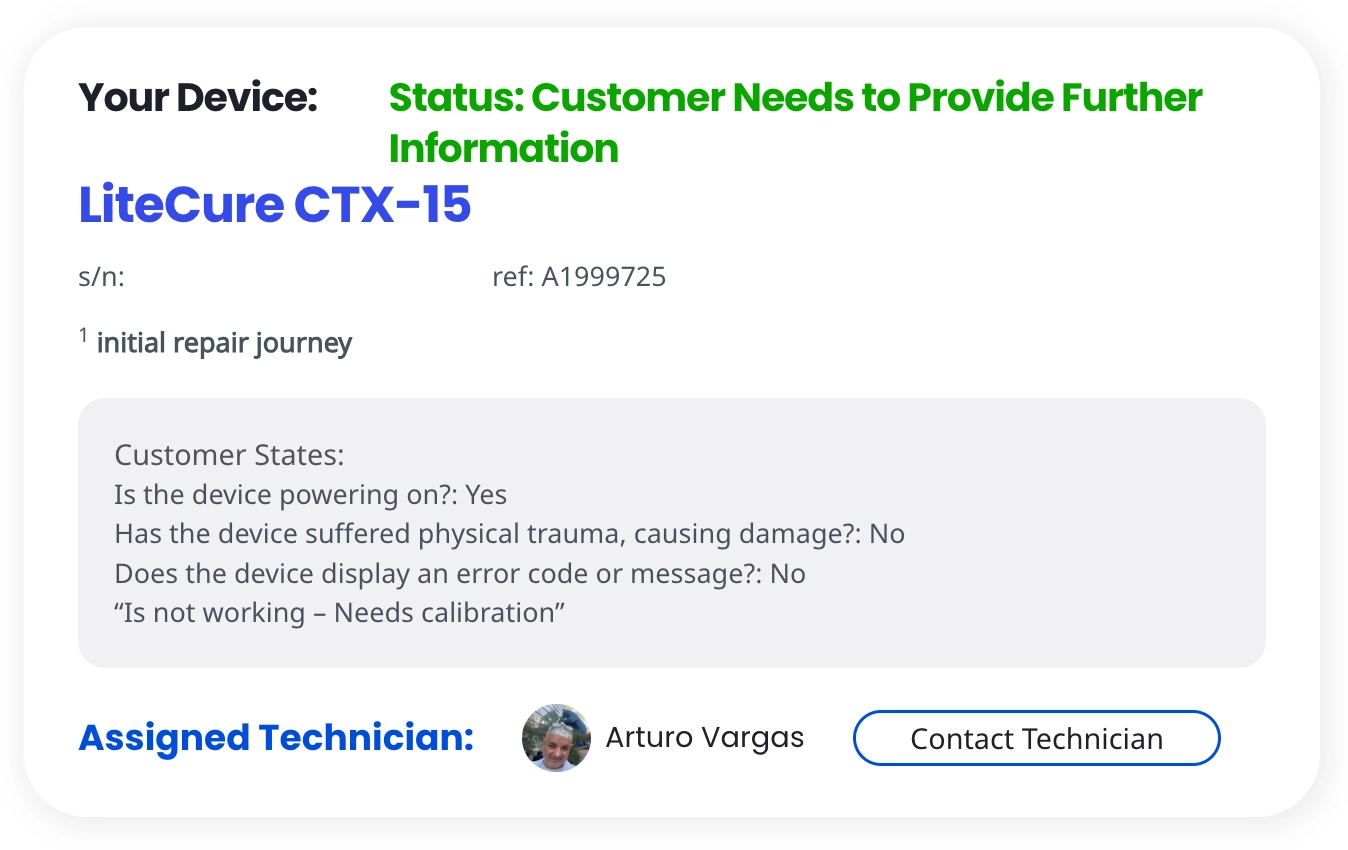
Your Chief Complaint is the core issue that made you submit a repair in the first place. It's the headline of your repair story.
Not:
-
"It's broken."
(We believe you. But we need the plot.)
More like:
- "Power light turns on, fan spins for two seconds, then it shuts off."
- "It boots, but the screen stays black unless I tilt it."
- "It works for 10 minutes, then crashes when it warms up."
This is the info that helps the technician replicate the problem and trace it accurately.
Where it shows up
When you submit the repair, your Chief Complaint is saved verbatim inside your Service Detail. It's part of the intake Q&A and becomes the reference point for evaluation, updates, and quoting.
If you ever wonder "Did you get my notes?"—yes. They live right there in your Service Detail.
What makes a Chief Complaint useful
A great Chief Complaint answers three simple questions:
1) What exactly is the failure?
Describe observable behavior:
- No power, no sound, no lights
- Powers on but won't boot
- Intermittent shutdowns
- Error message
- Overheating, burning smell (yes, say it)
- Distorted audio/video
- Physical damage symptoms
2) When does it happen?
Patterns are gold:
- Immediately on power-up
- After warming up
- Only under load
- Only with a specific accessory attached
- Only after it's been moved or bumped
- Randomly, but more often lately
3) What have you already tried?
This prevents repeat steps and speeds up diagnostics:
- Different outlet/charger
- Factory reset/firmware update
- Swapped cables/accessories
- Different battery (if applicable)
- Any previous repair attempts (even if it was a heroic DIY moment)
What to avoid (so we don't chase ghosts)
A few things tend to slow down troubleshooting:
- ❌ "It doesn't work" — True, but we need symptoms.
- ❌ "I think it's the motherboard" — Maybe! But it's more helpful to describe what you see happening than what you suspect.
- ❌ Leaving out trauma or liquid exposure — If it fell, got wet, got smoked, got zapped, or got sat on—we're not judging. We just need the truth so the technician doesn't waste time diagnosing a "mystery failure" that was actually caused by gravity.
Pro tips for writing yours (fast + effective)
If you're not sure what to write, steal this template:
"Device does [symptom]. It happens [when/pattern]. I tried [steps]. Any relevant history: [drop/liquid/previous repair]."
Example: "Device powers on, then shuts off after ~15 seconds. Happens every time. Tried a different charger and outlet. It was dropped last month but worked fine until this week."
That’s technician-friendly and saves everyone time.
Why it matters (yes, even if it feels obvious)
A clearer Chief Complaint can:
- Speed up the Initial Diagnostic Evaluation (IDE)
- Reduce back-and-forth questions
- Help prevent "can't reproduce issue" scenarios
- Improve testing accuracy once repaired
And in the rare case that repair isn't viable due to parts availability, hidden damage, or cost exceeding value, a clear complaint still helps us get to that conclusion faster—with less guesswork.
Technician Assignment
How your device gets paired with the right bench... like a dating app, but for circuit boards.
What this covers
This section explains what technician assignment is, where to see it in your Service Detail, and how to use Contact Technician in a way that helps (instead of accidentally slowing things down).
Once you complete the Repair Submission Journey, Acme Revival assigns your repair to a technician in our network. This is the moment your repair goes from "submitted" to "adopted by someone who owns a multimeter and uses it."
You’ll see the assigned technician listed in your Service Detail—your repair’s home base, timeline, and official record.
Why we assign technicians this way
Acme Revival is a distributed technician network (not one big storefront with a bell on the counter). Assignment helps route your device to the best available bench setup based on the details in your submission.
It also keeps things tidy:
- your device is tied to one accountable technician
- progress is documented in one place
- decisions stay attached to the repair record (no "wait... which email thread was that?")
Basically: less chaos, more clarity.
Where you’ll see the assignment
Inside the Service Detail, there’s a section that shows the assigned technician.
If you ever wonder:
- who's working the case
- what stage you're in
- whether something needs your attention
...your Service Detail is the fastest answer (and doesn't require psychic powers).
Contact Technician (yes, it’s a thing)
Inside your Service Detail, you may see a Contact Technician option. This is your built-in way to reach the technician assigned to your repair.
What you can do there:
- Leave a message: best for clarifying symptoms, answering follow-up questions, or adding "oh yeah, I forgot to mention..." details.
- Call (when available): there's a call option—but technicians aren't obligated to answer. Their main job is hands-on technical work, and phones are notoriously unhelpful at holding solder in place.
Why messaging usually wins
A good message is like leaving a sticky note on the bench—clear, specific, and easy to act on. It lets the technician pick it up at the right moment in the workflow (instead of mid-tiny-screw removal, where every call feels like a jump scare).
Can you drop off your device in person?
Not in our model. Technicians operate from non-public workspaces that aren't set up for walk-ins, drop-offs, or "I'm already outside" situations.
Email Confirmation
Your receipt that you didn't hallucinate submitting a repair.
What “Email confirmation” means
When you finish the Repair Submission Journey, Acme Revival sends an email confirmation to the address you entered. This email contains the most important thing in your entire repair process:
That Service Detail link is your personal repair dashboard—everything happens there, and it updates live as your repair progresses.
What's inside the confirmation email
Typically, your confirmation email includes:
- Your Service Detail link (unique to your device/submission)
- Your reference information (so you can identify the repair)
- A reminder that your next steps—shipping, quotes, payments—are managed through the Service Detail
No separate login is required (and there isn’t one). The link is the access key.
Why the Service Detail link matters so much
Think of the Service Detail as your repair command center. It's where you'll see:
- your current status (ready to ship, shipped, in service, awaiting parts, etc.)
- technician updates and notes
- quotes (if applicable) and the ability to respond
- buyout offers (when available)
- payment options (ACH via GoCardless or mailed check)
- receipts (when paid)
- warranty actions later, if needed
If you're wondering what's happening, the fastest answer is almost always there.
“I can’t find the email” — common fixes
Before panic-refreshing your inbox like it owes you money, try:
- Check spam/junk (email filters are... enthusiastic)
- Search your inbox for "Acme Revival" or "Service Detail"
- Search for the sender email help@acmerevival.com
- If you used a work email, check quarantine/filtered folders
And if you do find it: star it, pin it, tattoo it on your soul—whatever your organizational style is.
Need to update your email or address?
You can do that from inside your Service Detail:
- Look for the pencil icon near your customer info
- You'll receive a 2FA code by email to confirm the change
This keeps your repair secure and ensures shipping/updates go to the right place.
Email confirmation isn't just "thanks for submitting"—it's the delivery method for your Service Detail link, which is how you manage the entire repair.
If you have that link, you have everything you need to move the repair forward.
Preparing Your Device
How to ship your device without turning it into modern art.
Why “preparing your device” matters
Most repair delays don’t come from the technician bench... they come from the box.
Good prep helps your device arrive:
- intact (love that)
- complete (even better)
- testable (the best)
And it prevents the classic “it worked before shipping” plot twist.
We strongly recommend sending the full device, not just a sub-board or partial assembly.
Why full-device shipment wins:
- lets the technician replicate your exact setup
- allows thorough testing before and after repair
- reduces “can’t reproduce issue” situations
- can maximize buyout value if you later decline repair
If you truly can’t ship the full device, subassembly-only shipment can be discussed as a last resort—but full-device is the default for a reason.
Send anything needed to properly power, connect, or operate the device, like:
- chargers / power adapters
- power cables
- batteries (if removable / required)
- dock, modules, or proprietary connectors
- SD cards or media (only if it’s directly tied to the issue)
Accessories help the technician test under real-world conditions and confirm the repair is actually solved.
A good rule: if it’s not relevant to powering, operating, or reproducing the issue... don’t include it. (We love surprises. Your repair bench does not.)
We recommend:
- Use a sturdy box (double-wall if possible)
- Cushion the device on all sides (no box-to-device contact)
- Prevent movement inside the box (movement = sadness)
- Protect corners and screens (they’re always the first to complain)
- Seal with proper packing tape (not the “one strip and hope” method)
If the device has fragile external parts (knobs, ports, antennas, lenses), cushion and stabilize those areas especially well.
In most cases, Acme provides a prepaid UPS inbound label, accessible directly inside your Service Detail (usually in an alert banner).
A few notes that save stress:
- the label may take a few hours to appear after submission
- the label does not expire
- the listed weight/dimensions may not look perfect (normal)
- the label may show the technician’s info as the return address (also normal)
Important: Inbound shipping via our prepaid label is provided at no cost to you.
If you want to be extra helpful, include a short note inside the package with:
- your name
- your Service Detail reference number
- a one-line description of the issue
It’s not required, but it can help with quick identification at check-in.
A quick “should you ship this?” reality check
We generally discourage shipping items that are:
- too large/heavy to ship safely
- extremely fragile without proper packaging
- impossible to test without the full unit and key accessories
If you can ship it safely and completely, you’re in a great spot.
The best repair outcomes start with the best shipment prep:
- ship the whole device
- include key accessories
- pack it securely
- use the Service Detail label
Your future self (and your device) will thank you.
Sending Your Device
How to get your device from "my desk" to "the technician bench" with minimal drama.
In most cases, Acme provides a prepaid UPS inbound shipping label. You'll access and print it directly from the alert banner inside your Service Detail.
A few important notes:
- The label may take a few hours after Service Detail creation to appear
- The label does not expire
- There's no cost to you for inbound shipping when Acme provides the label
If you're hunting for it, start with the Service Detail—always.
Sometimes customers notice odd details on the label and assume it's invalid. It's usually fine.
Common "totally normal" things:
- The label shows the technician's info as the return address
- The weight or package dimensions look slightly inaccurate
That's a byproduct of prepaid label generation and doesn't impact delivery.
We strongly recommend sending the entire device whenever possible.
Why this matters:
- More accurate testing and replication of your setup
- Better evaluation (and fewer "missing piece" moments)
- Maximizes buyout value if you later decline repair
- Prevents incomplete/misleading results from partial assemblies
Subassembly-only shipments should only happen if full-device shipping is truly impossible or you insist—otherwise, send the complete unit.
Send anything required to power or properly test the device:
- chargers / power adapters
- power cables
- batteries (if removable/required)
- proprietary connectors or docks
- any accessory directly tied to the issue
This helps confirm the repair is real-world successful—not just "bench successful".
UPS is great, but the box should do the heavy lifting:
- strong box
- cushioning on all sides
- no movement inside
- protect screens/corners/fragile parts
- seal well
If the device can rattle, it will rattle. And rattling is how repairs become "repairs + shipping damage".
You'll ship the device using UPS, using the label provided in your Service Detail (when applicable). We don't coordinate in-person handoffs.
Important: Acme technicians do not accept walk-ins or drop-offs. Most work from private spaces that are not public service counters.
So if you were planning a road trip... save it for something fun.
Once shipped, the Service Detail will display the shipment details and status updates as the device progresses through the process.
If you're ever wondering:
- "Did it arrive?"
- "What's next?"
- "When do diagnostics start?"
...the Service Detail is the best place to look.
Sending your device is simple:
- 1. print the UPS label from your Service Detail
- 2. ship the full device (plus accessories)
- 3. pack it well
- 4. track everything in the Service Detail
Do that, and you've already done the #1 most helpful thing for a smooth repair.
next topic: "Device Arrival"
Device Arrival
When your shipment lands and the repair officially enters the technician's queue.
What happens when the package is delivered
A delivery scan means UPS has dropped the package at the destination. After that, the technician (or the technician group's intake process) needs to physically receive it and get it into the workflow.
This part is mostly behind-the-scenes: think “box arrives → box is received → device is queued.”
What you’ll see on your side
Your Service Detail is where arrival-related progress will show up. It’s the best place to confirm that the device has been received and to see when the technician posts the next update.
What’s next (high level)
After arrival and check-in, the next meaningful milestone is usually the Initial Diagnostic Evaluation (IDE). If your repair flow requires a quote, that quote will be posted to your Service Detail once the technician completes the evaluation steps needed to generate it.
If it looks quiet for a bit
It’s normal for there to be a short gap between “delivered” and “checked in,” especially if the package arrives outside the technician’s active intake window. The key thing is that your Service Detail will reflect the next actionable update as soon as it’s available.
Deleting Your Repair
How to permanently remove a submission (and stop the reminder emails) — before anything ships.
At Acme Revival, your repair request exists as a Service Detail created during the online submission journey. Deleting your repair means deleting that Service Detail.
Once it's deleted:
- it's gone permanently
- automated emails and reminders stop
- it cannot be restored
So yes — this is the "nuke it from orbit" button (but with a safety latch).
Who can delete it
Only the customer can delete a Service Detail.
The Help Desk can’t delete it for you, even if you ask nicely, urgently, or with three exclamation marks. This is by design: actions inside the Service Detail are restricted to the customer as the only authorized user.
When deletion is available
Deleting is only possible when the repair is still in a pre-shipment state.
- ✅ You'll see the delete option if the device has not shipped
- ❌ You won't see it once the device has shipped
If you don’t see a delete option, it means the system isn’t allowing deletion for that Service Detail at this time.
How to delete your repair (step-by-step)
- Open your Service Detail using your unique link
- Click the Actions tab
- Select Delete Service Detail
- Complete the one-time email verification (OTP)
After verification, the deletion is immediate and irreversible.
What deletion does (and does not) do
Deletion does:
- permanently remove the Service Detail
- stop automated reminder emails tied to it
Deletion does not:
- happen automatically (Service Details don't auto-expire)
- happen via email request (it must be done by you inside the Service Detail)
Initial Diagnostic Evaluation
The “what’s actually going on?” phase — written by a human, not a template goblin.
What the IDE is
The Initial Diagnostic Evaluation (IDE) is the first structured diagnostic write-up posted to your Service Detail after the technician begins evaluation.
It's meant to answer:
- What symptoms were observed on the bench?
- What tests were performed first?
- What failure path is most likely?
- What parts or subsystems may be involved?
It's a snapshot of early findings—not a final verdict—and it's written so you can follow the logic without needing to own an oscilloscope.
What the IDE is not
- It’s not a guarantee that the repair is complete
- It’s not a “repair has started” authorization by itself
- It’s not a parts order confirmation
- It’s not a final quote (unless your flow includes that as part of the same update)
Think of it as the technician saying: “Here’s what we’re seeing, and here’s where we’re going next.”
“This looks generic...” — why it can feel that way
Customers sometimes notice that IDEs look similar in structure across different repairs. That’s true—and intentional.
The format is standardized so it's readable and consistent (nobody wants a diagnostic report that reads like a ransom note). But the content is based on live bench observations from your specific device.
A helpful way to frame it is:
Diagnostics and repair are not mutually exclusive — it usually requires extensive diagnostic work for brief moments of repair.
That means the “repair” might be quick in execution (swap, rework, correction), but only after the technician has done the hard work of tracing, confirming, and verifying the failure path.
What you’ll typically see inside an IDE
While the wording varies by device, the IDE often includes:
- Device identification (make/model and what category it falls into)
- Primary symptom confirmation (what the technician observed)
- Initial testing performed (what they checked first)
- Most likely failure areas (power section, control board, logic path, etc.)
- Next diagnostic steps (what they’ll do to narrow it down)
- Quote/authorization language (a clear statement that repair work proceeds only under the appropriate approval model)
What you should do when an IDE is posted
Usually: nothing immediately—unless your Service Detail shows a required action (like reviewing a quote).
The IDE is informational. Your Service Detail will clearly show if the next step needs you to:
- approve a quote, or
- choose another available option shown there
If there’s no action requested, the best move is simply to let the workflow continue.
When More Info Is Needed
Because "it's acting weird" is emotionally valid, but technically incomplete.
Why we sometimes need more information
Even with a solid intake, some issues can be tricky to reproduce on a bench—especially if the problem is intermittent, environment-dependent, or tied to a specific accessory or setup.
When the technician can’t confidently confirm the failure path based on what’s already provided, we’ll request more info so we don’t:
- chase the wrong root cause
- miss the actual symptom you care about
- waste time testing scenarios you never experienced
In other words: more info usually means we’re trying to be precise, not difficult.
What “more info” usually looks like
When we request additional information, it’s typically one of these:
Examples of the kind of detail that helps:
- What exactly happens when you power it on? (lights, sounds, error message, timing)
- Is the issue constant or intermittent?
- Does it occur only after warming up or under load?
- Did anything change right before the issue started?
Sometimes we just need a yes/no:
- “Are you still seeing the same symptom you reported at submission?”
- “Does the device fail in the same way every attempt?”
If your device interacts with other gear, we may ask:
- what accessories/cables are being used
- what power source/adapter is involved
- what configuration triggers the issue
No need to send a novel—just the key pieces that narrow the possibilities.
The best way to respond (fast and helpful)
If we ask for more info, try replying with:
What you see/hear
When it happens
How often it happens
Anything you already tried
Any relevant history (drop, liquid exposure, prior repair attempts)
Bonus points if you keep it bullet-pointed. The technician bench loves clarity.
What not to worry about
“Am I slowing things down by not knowing?”
No. Most customers aren’t expected to diagnose anything.
We’re not looking for a guess like “it’s the motherboard.” We’re looking for observable behavior like “it powers on for 3 seconds, then shuts off.”
“Do I need to take the device apart?”
No. We don’t want you disassembling devices just to answer questions. Stick to what you can observe safely.
Where you’ll see these requests
If more info is needed, the request will come through:
- your Service Detail updates, and/or
- an email from the Help Desk referencing what’s needed
Either way, the goal is the same: get clear inputs so the technician can make confident, efficient progress.
Quotation
The official “here’s the plan and the price” moment—no crystal ball required.
What this covers
This section explains what a quotation is in Acme’s legacy evaluation workflow, what it represents, and what it does (and doesn't) promise.
What a quotation is
A quotation is the official repair quote published to your Service Detail after the technician evaluates the device.
It’s the "real number" tied to real bench findings—meant to be clear, complete, and actionable. Or put another way: it’s not a vibe. It’s a decision point.
What a quotation represents
A quotation represents the defined scope of work that will be performed as the repair is attempted, based on what was found during evaluation.
That includes:
- the work required to pursue the repair outcome
- any required parts included in that scoped attempt (when applicable)
- verification/testing appropriate to the device
And yes, the classic truth still applies:
Diagnostics and repair are not mutually exclusive — it usually requires extensive diagnostic work for brief moments of repair.
So even if the "fix" sounds simple, the work to confidently get there may not be.
What a quotation does not guarantee
A quotation is not a guarantee that the device will be successfully repaired.
What it does guarantee is:
- the technician will perform the attempted service within the quoted scope, and
- your Service Detail will reach a clear documented outcome (successful or unsuccessful)
Sometimes devices come back to life. Sometimes they choose drama. The quotation covers the attempt—not the device’s personality.
If the outcome is unsuccessful (refund expectations)
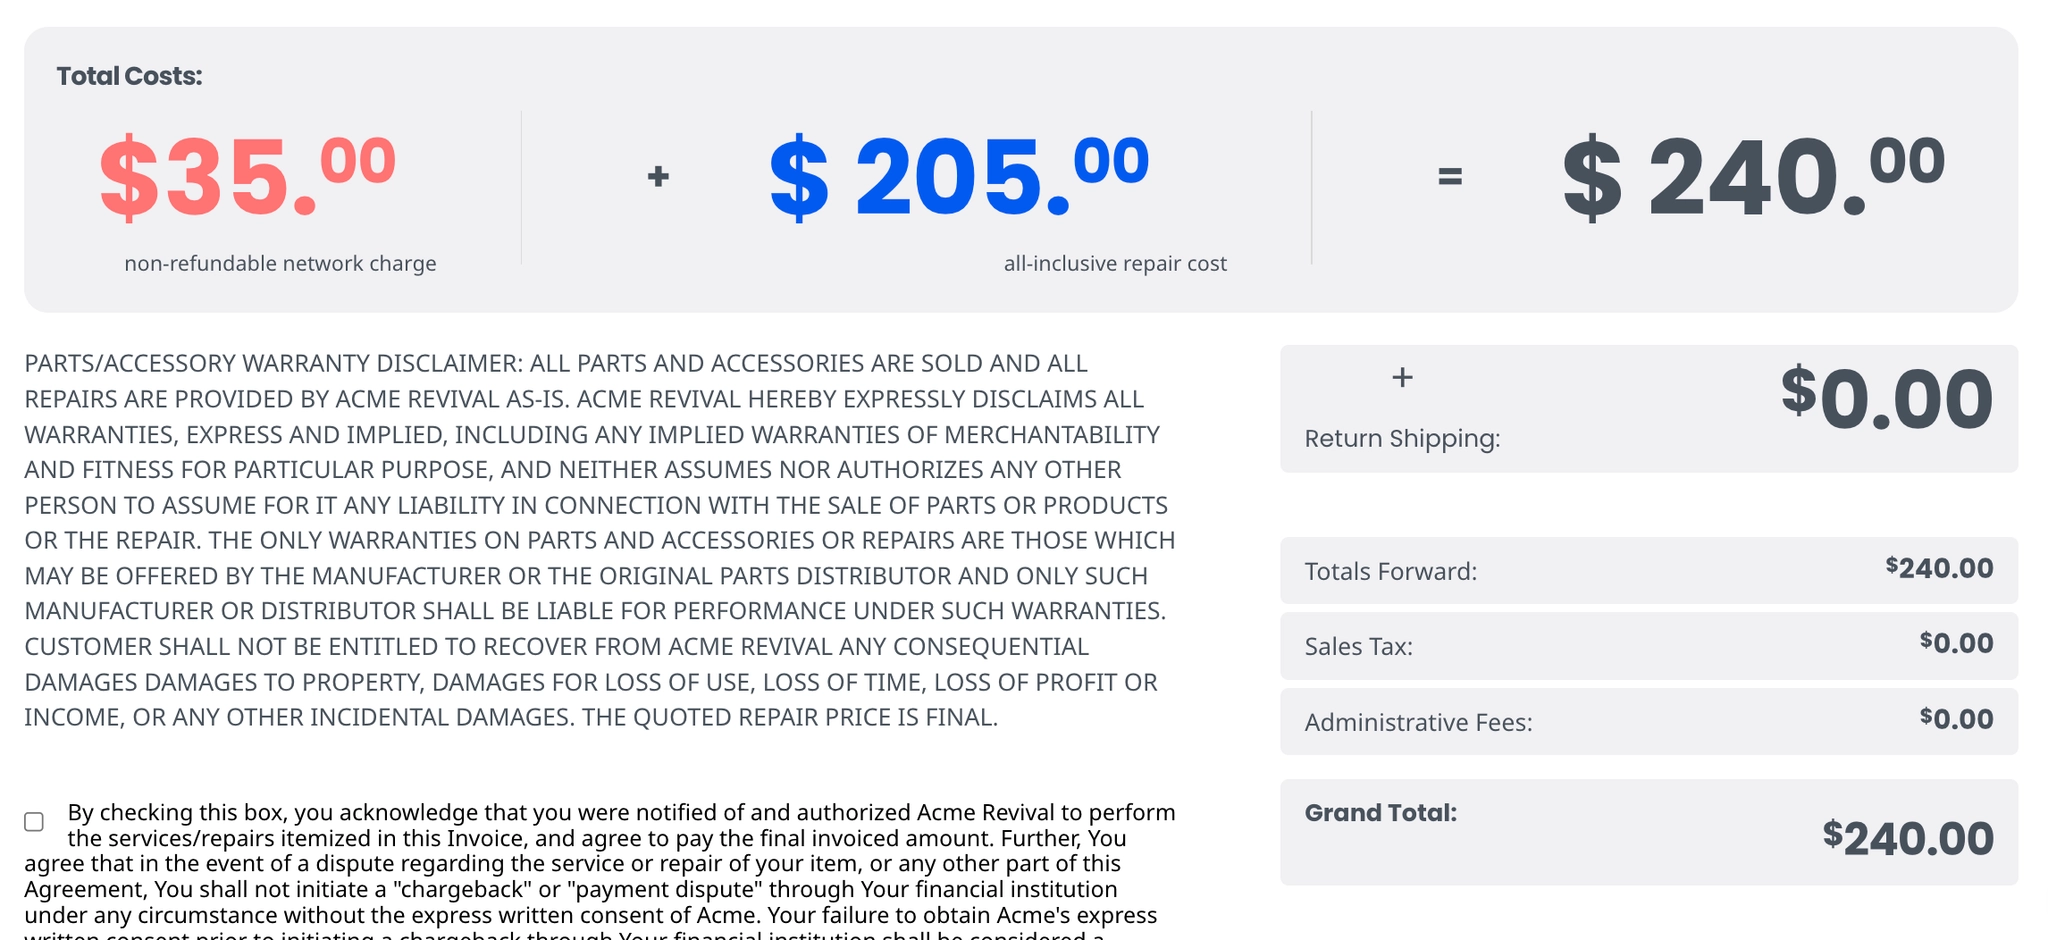
If a repair is attempted and the outcome is unsuccessful, most charges are typically refunded— with key exceptions reflected in your Service Detail:
- the $35 Network Technician Fee is not refunded
- return shipping may not be refunded
Your Service Detail is the official source for the exact breakdown in your case (so you don’t have to guess which line items are included).
Where to view it (and why that matters)
Your quotation will appear in your Service Detail, which is the system of record for:
- the quoted amount
- your response options
- the timeline and next steps
Email is great for questions, but the Service Detail is where the official quote lives.

Quotation Response
The moment you officially say “yes,” “no,” or “let me choose the other button that’s right there.”
What a quotation response is
A quotation response is your official decision on the repair quote posted to your Service Detail. It's not just a message—it’s a recorded action in the system, tied to your repair record.
Think of it like clicking “confirm order,” except instead of ordering pizza, you’re authorizing a technician to do battle with electronics.
Where you respond (the one true place)
You submit your quotation response inside your Service Detail.
Not by:
- replying to the email with “APPROVED ✅”
- sending a “please proceed” message and hoping it magically attaches itself to the quote
- telepathically consenting (we tried, it’s unreliable)
We can absolutely answer questions by email—but we can’t respond to the quote on your behalf. Only the customer can take that action inside the Service Detail.
How to submit your response (fast and painless)
-
Open your Service Detail using your unique link
-
Find the quotation section
-
Select the response option available there (approve/decline, or other option shown)
-
Confirm your selection
Once you do, the Service Detail updates to reflect your decision.

Why it has to be done this way
Because the Service Detail is the official record. Keeping quote decisions in one place means:
- your authorization is secure (only you can submit it)
- the timeline is clear (no “did we get your email?” confusion)
- nothing gets lost in inbox limbo
In other words: fewer oops moments, more clean progress.
Repair Commencement
When your device stops “waiting politely” and starts “meeting the bench.”
What “repair commencement” means
Repair commencement is the moment the technician starts active bench work aimed at getting to an outcome. It’s the shift from “in the queue” to “hands on device”.
This isn’t a dramatic ceremony with a ribbon-cutting (though we support it spiritually). It just means the work has officially begun under the rules of your Service Detail.
What triggers the start
Bench work begins when the right authorization is in place for your repair flow—meaning the Service Detail shows the correct “green light” state.
If your repair requires an approval step, that’s what starts things. If your repair is set up under Flat-Rate Up-Front Pricing (FRUFP), the technician proceeds under that structure, with additional approval only if the scope changes due to required parts.
Translation: the technician doesn’t start because someone feels ready—they start because the Service Detail says “go”.
The thing most people don’t expect
Here’s the big truth that saves a lot of confusion:
Diagnostics and repair are not mutually exclusive — it usually requires extensive diagnostic work for brief moments of repair.
So yes, a technician might spend a long time measuring, tracing, confirming, and narrowing down a failure path... and then the actual repair action might be fast.
- That’s not “we spent all day to tighten one screw”.
- That’s “we spent all day proving which screw was the villain”.
What repair commencement does not mean
Repair commencement does not automatically mean:
- your device is already fixed
- the outcome is guaranteed
- the job is just “one quick part swap”
- every repair follows the same timeline
It simply means the technician is now actively working toward a clear outcome—successful or unsuccessful—based on what your Service Detail authorizes.
Repair Developments
The live play-by-play of your repair—now featuring the very official-sounding phrase: “service bulletins.”
What this covers
This section explains what repair developments are, how they show up as service bulletins in your Service Detail, and how to read them without assuming every update is either a miracle or a catastrophe.
What repair developments are
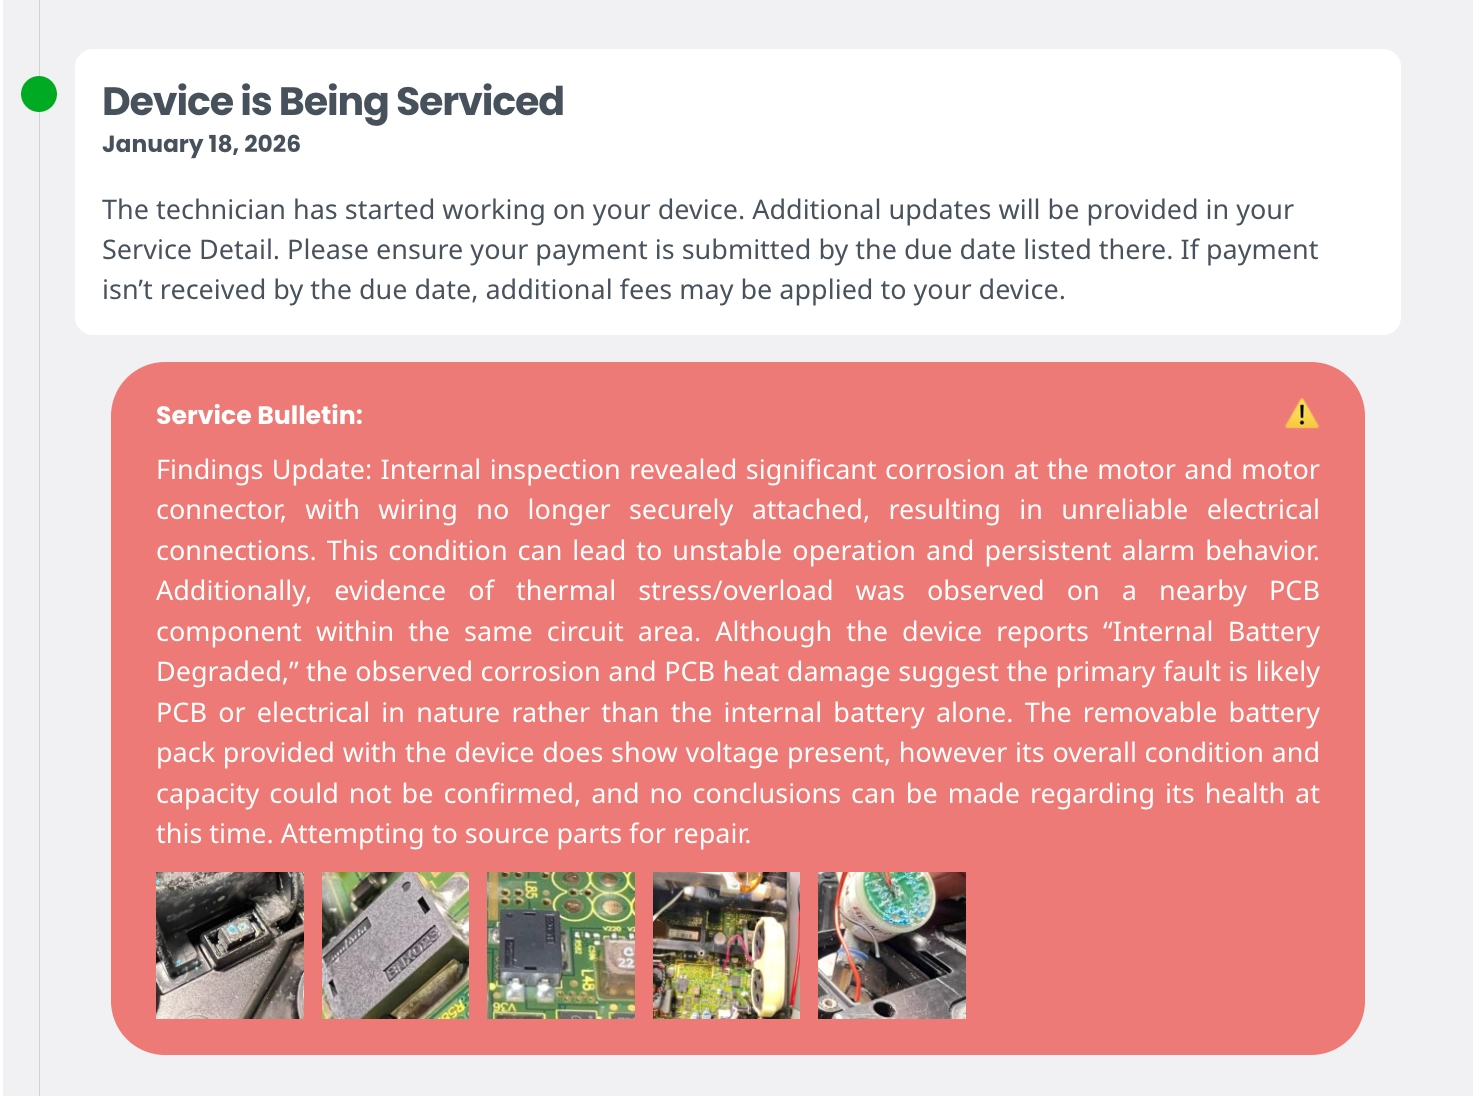
Repair developments are the progress notes for your repair—status changes, technician findings, and key milestones documented as the work moves forward.
In the Service Detail, these often appear as service bulletins.
Technicians might say “we posted an update,” but what they mean (in platform terms) is a service bulletin or timeline update was added to your Service Detail. Same idea, different outfit.
Where you’ll see service bulletins
Your Service Detail is the main stage. Look in the timeline / updates area for:
- Service bulletins (formal progress entries)
- Other status timeline updates that show where the repair stands
If you want the most accurate “what’s happening right now,” check the newest service bulletin first.
What a service bulletin usually includes
Service bulletins can vary by device and complexity, but they commonly include:
- what the technician observed or confirmed
- what work is being performed or what changed
- what the next milestone is
- whether anything is pending (and if action is needed, it’ll show clearly in the Service Detail)
It’s meant to be transparent and legible—not a cryptic puzzle box.
Why some bulletins are short (and that’s normal)
Not every service bulletin will read like a dramatic detective novel.
Sometimes the most accurate update is simply:
- “Testing in progress.”
- “Continuing evaluation.”
- “Work underway.”
That usually means the technician is mid-process and the next meaningful checkpoint hasn’t landed yet.
(Repair reality: 90% careful investigation, 10% “aha!” moment.)
How to use developments without spiralling
A few sanity-saving tips:
- Read newest-first: this isn’t a streaming series—no need to start from episode one each time.
- Look for action prompts: if you need to do something, the Service Detail will make it obvious.
- Reference the bulletin when you email us: “In the latest service bulletin dated ___, it says X—can you clarify Y?” = fastest support.
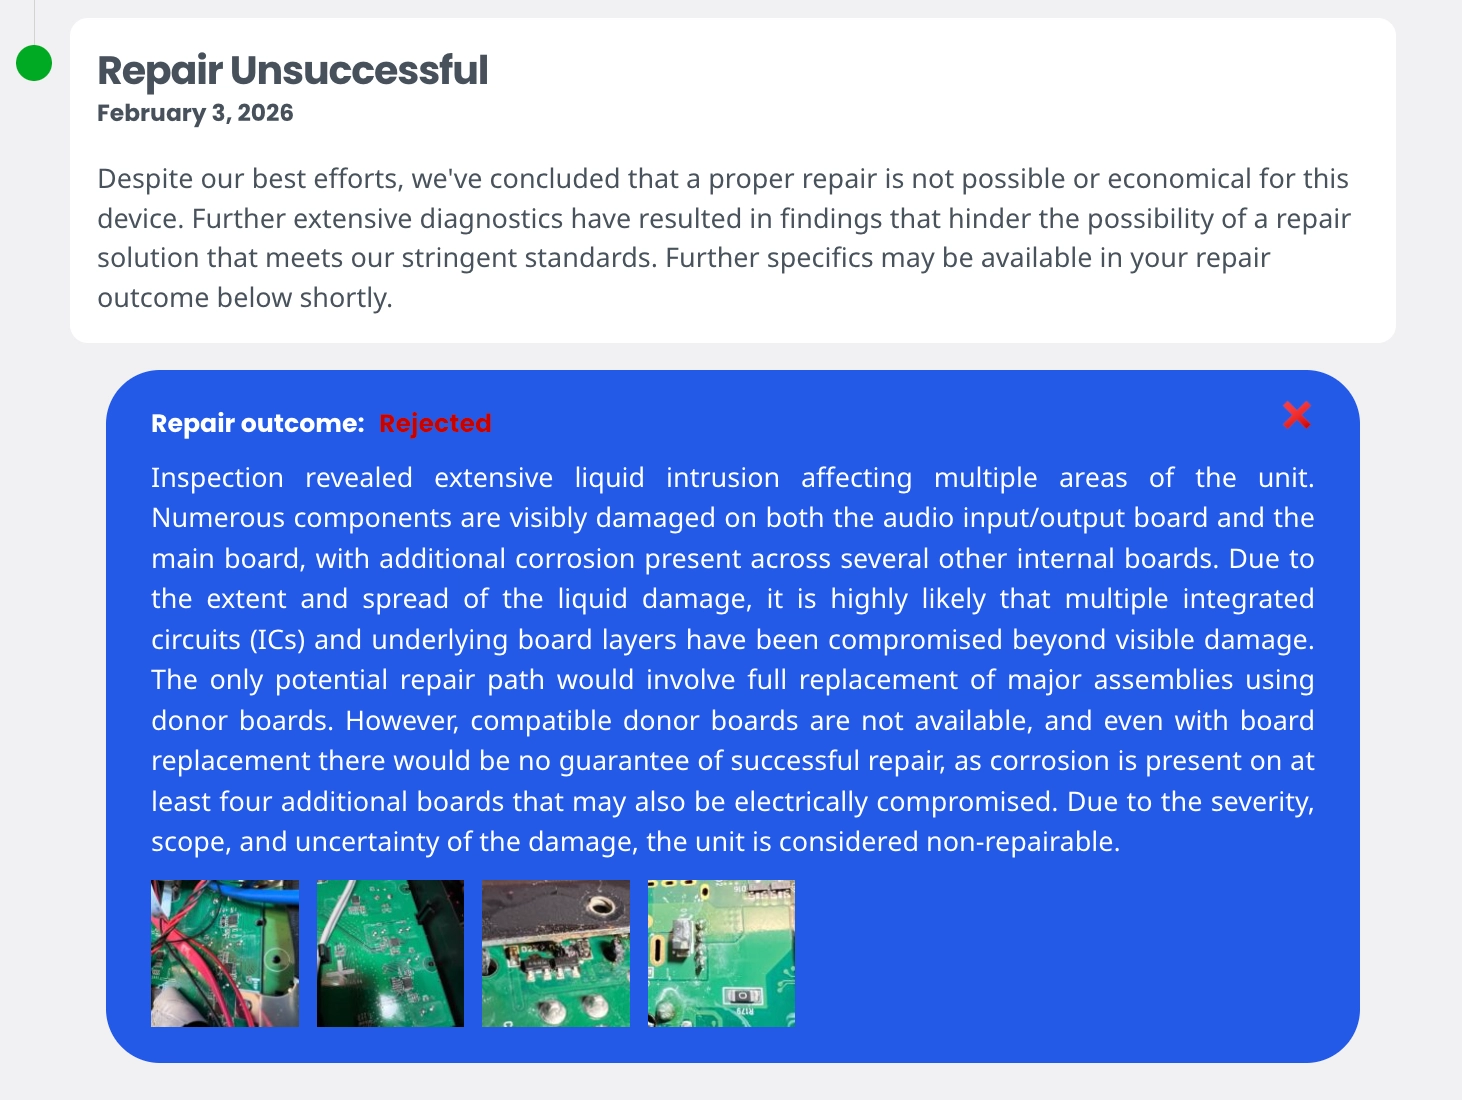
Repair Outcomes
The final verdict: did we revive it, or did it politely refuse to come back to life?
What this covers
This section explains what “repair outcomes” are, what the two possible outcomes mean, and what changes in your Service Detail once an outcome is posted.
What counts as a repair outcome
A repair outcome is the official resolution of the repair attempt, posted to your Service Detail. Outcomes fall into two categories:
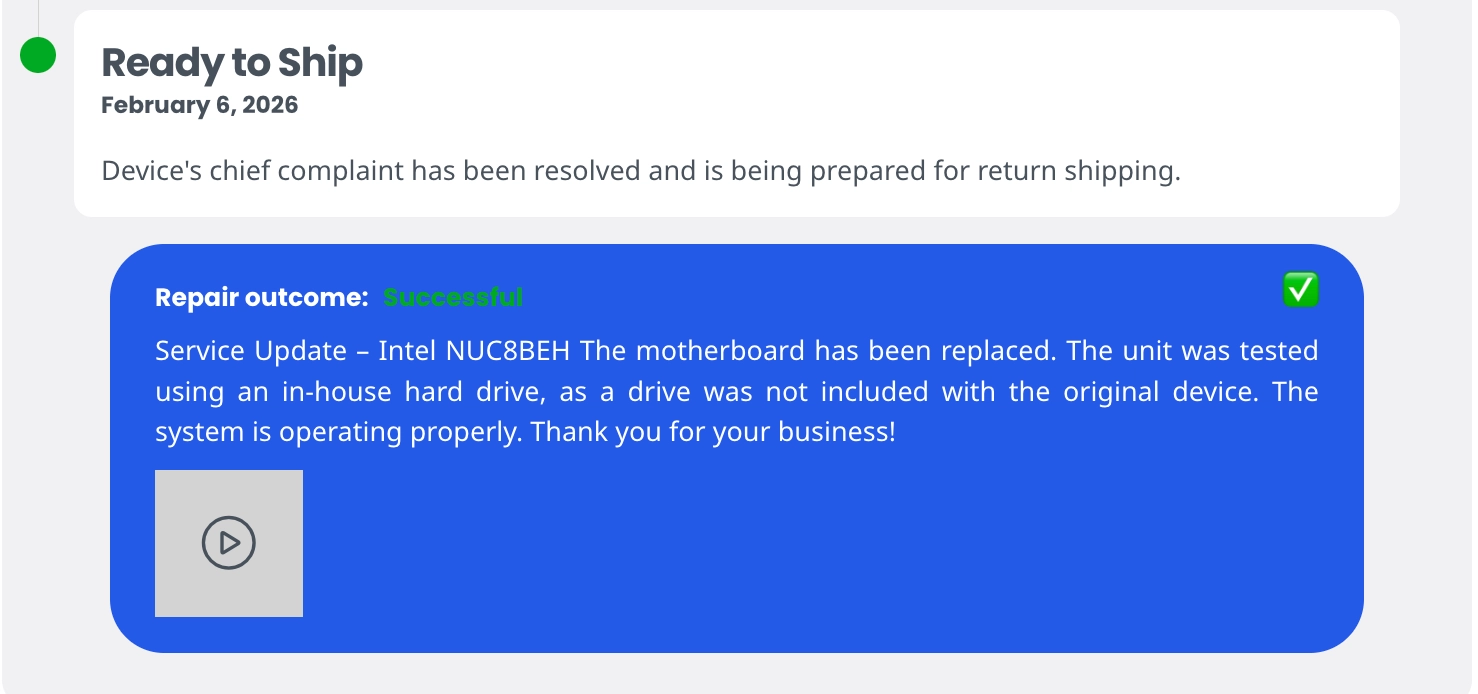
- Successful the device is repaired and verified
- Unsuccessful the repair attempt could not be completed successfully
No vague “maybe it’s fine” energy here—outcomes are meant to be clear and final.
Successful outcome (what it means)
A successful outcome means the technician was able to restore the device to working condition based on the service performed and the testing available for that device.
If you’re thinking, “so it’s fixed-fixed?” — the answer is yes: functional, verified, and ready to move to the next step shown in your Service Detail.
Successful repairs are covered by a 180-day guarantee from the delivery date (the guarantee process has its own topic, so we’ll keep it scoped here).
Unsuccessful outcome (what it means)
An unsuccessful outcome means the technician attempted the repair but could not restore the device to working condition. This can happen when:
- the fault is beyond what can be corrected with available parts or methods
- parts can’t be sourced
- the device has deeper or hidden damage that prevents a viable repair
- the repair is not feasible relative to device condition
It’s not the outcome anyone hopes for—but it’s still a clean, documented result posted to the Service Detail.
What changes after an outcome is posted
Once an outcome is published, your Service Detail becomes the authoritative place for next steps. One important operational detail:
Customers have 15 days to pay after an outcome is published if a balance is due. Your Service Detail will show a pay-by date.
If the balance remains unpaid:
- Day 15: status changes to Unclaimed Device Pending and an $85 storage fee is added
- Day 30: the device is considered abandoned and can no longer be reclaimed (any remaining balance is removed/waived and the relationship ends)
Not a threat—just the defined process so devices don’t live in limbo forever like forgotten leftovers in the office fridge.
How To Pay
Where to click, what to look for, and how to know it actually went through.
What this covers
This section shows where to find the payment button in your Service Detail, what happens after you click it, and how to confirm payment was applied—without getting lost in a long list of payment methods (since options can vary by Service Detail).
Open your Service Detail link and look for the section that shows:
- your balance due, and
- the payment action (typically Pay Now)
If a balance is due, the payment prompt will be presented right there—no scavenger hunt required.

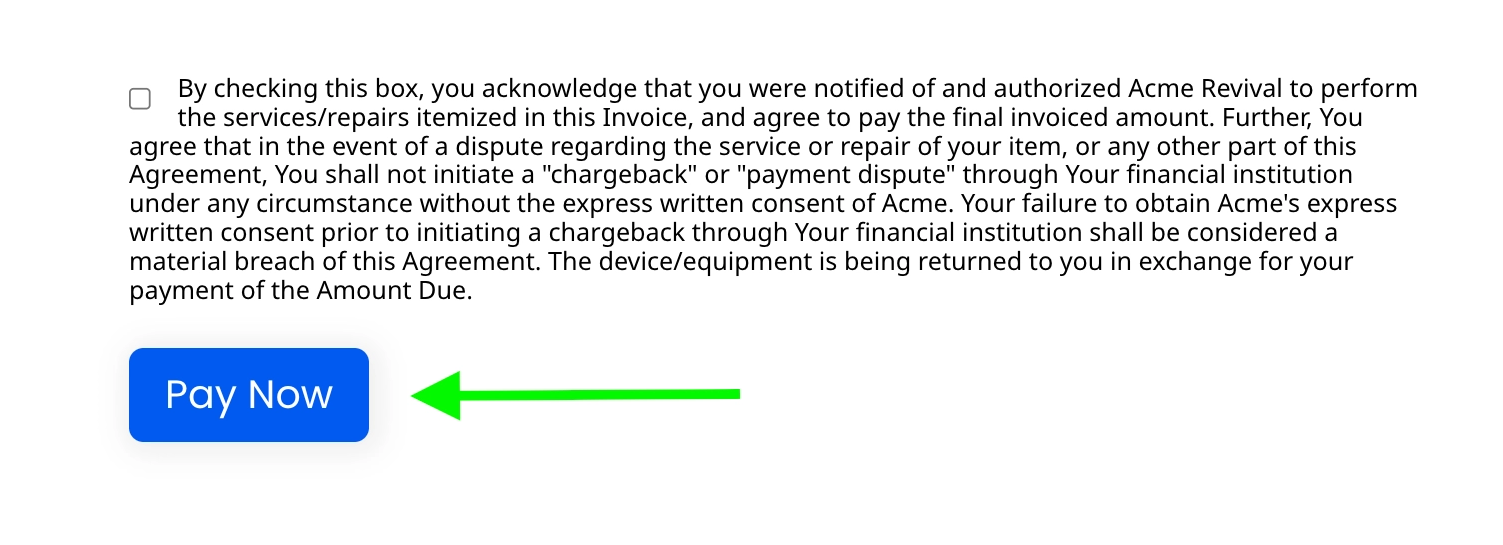
When you click Pay Now, your Service Detail will guide you through whatever payment method(s) are available for your specific service.
Important: payment options can vary by Service Detail, so the most correct instructions are always the ones shown on that page.
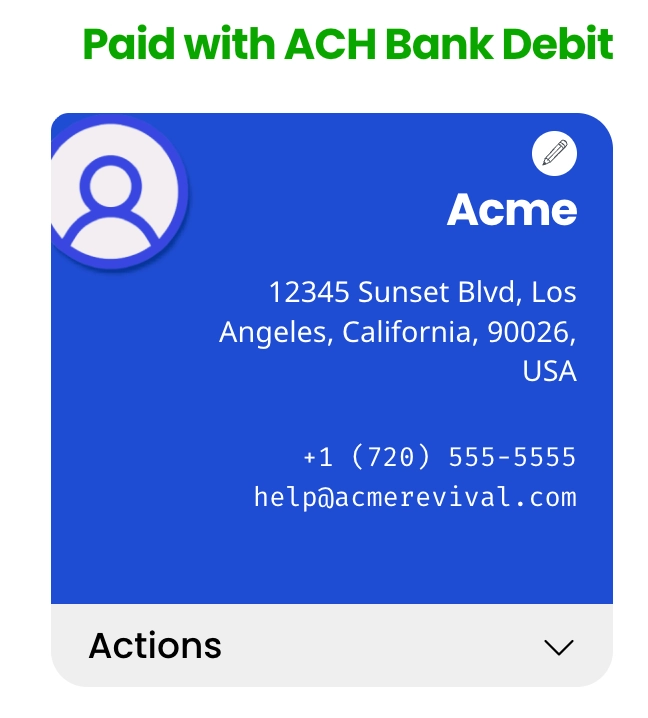
After payment is received and applied, your Service Detail will reflect confirmation in two common places:
Payment status / balance section
Your balance due will update (often to $0 when fully paid), and the payment status will change accordingly.
The "paid with" line
You'll typically see a "paid with" entry that indicates how the payment was made once it's confirmed.
That "paid with" element is your quick proof that the payment has been recorded on the service.
If you need to pay by card
Card payments aren't always presented as a standard option inside the Service Detail. If you need to use a credit/debit card, email the Help Desk and we can provide available options for your situation.
Important note: any third-party payment tools are contracted directly between you and that provider, and your Service Detail remains the official record of when payment is received and applied.
Return Shipping
How your device gets packed up, labeled, and sent home like it just finished summer camp.
What this covers
This section explains what happens on the technician side when your device is being shipped back, where to find tracking in your Service Detail, and how return transit typically works—without rehashing return shipping fees.
What happens before your device ships back
Before anything leaves the bench, the technician will get the device ready for safe return. That generally includes:
- using the original packaging when possible (unless it’s damaged or no longer protective)
- securing the device so it doesn’t bounce around in transit
- sealing the box properly (tape is cheap; crushed corners are expensive)
- applying the UPS shipping label
It’s basically the reverse of “unboxing,” except with more responsibility and fewer dopamine hits.
Where to find the tracking number
Once the return shipment is created, your UPS tracking number will appear near the top of your Service Detail.
If you’re looking for the fastest “did it ship yet?” confirmation, that top tracking area is your best friend.
How it ships (and how long it usually takes)
Return shipments are sent via UPS Ground in most cases.
Typical transit time is around 3 to 6 days (depending on distance and carrier routing).
Not instant, but also not “crossing the ocean on a raft” slow.
Pickups happen daily (generally in the afternoon)
Once a package is ready, it enters the normal UPS flow. Pickups (or drop-offs) occur daily, generally in the afternoon, excluding typical carrier holiday interruptions.
So if you see tracking created, it may take a bit for the first scan—UPS has to actually meet the box in the real world.
If you prefer to use your own UPS label
In some cases, customers may choose to provide their own UPS label for return shipping. If you go that route, the label must be UPS so it fits the outbound process.
(UPS is the house language. We can’t translate FedEx into UPS at the shipping counter.)
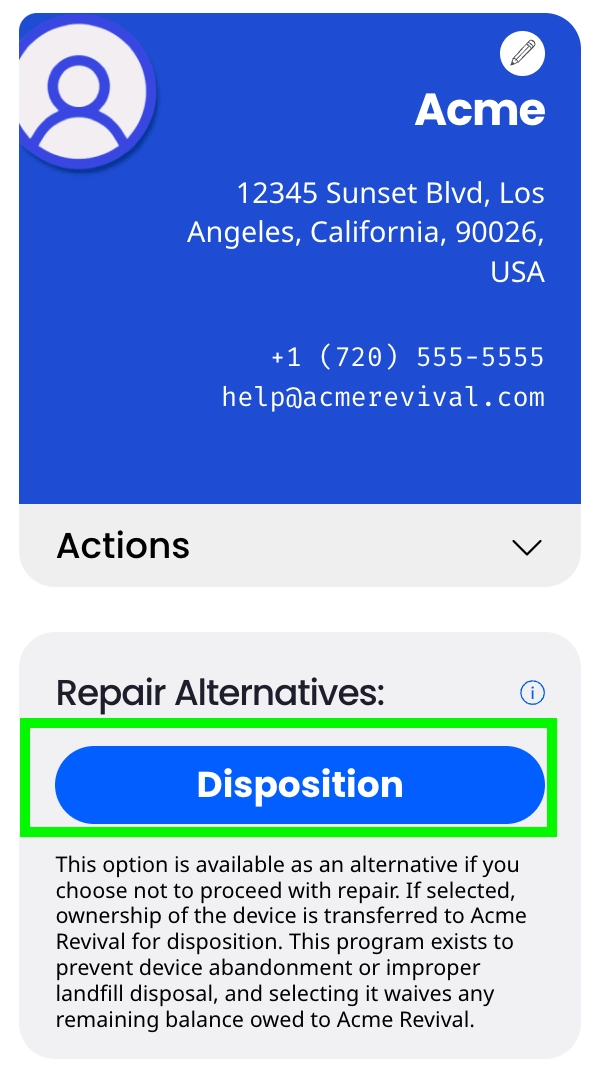
Alternatives to Repair
Because sometimes the best fix is... choosing a different plan.
What this covers
This section explains what alternatives may exist when you decide not to proceed with repair, and where those options live (hint: your Service Detail).
Why someone might choose an alternative
Repair isn’t always the best move. Common reasons customers choose an alternative include:
- the cost to repair outweighs the value of replacing
- the device is no longer worth investing in
- timing doesn't work
- the device is too far gone (emotionally or electrically)
No judgment. We’ve all had devices that were “one more failure” away from being turned into a paperweight.
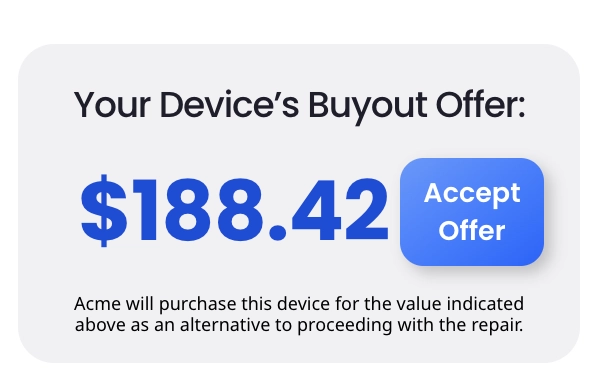
Buyout (when available)
In some cases, a buyout offer may be available in your Service Detail. If it’s available to you, you can accept it directly from the Actions tab.
A few key points:
- buyout availability is conditional (it won't appear for every repair and won't be available in every stage)
- accepting a buyout is something only the customer can do inside the Service Detail
- buyout payments are typically issued by check within 30 days
If you don’t see the buyout option, it means it isn’t currently available for that Service Detail.
Choosing not to proceed (what that looks like)
If you decide not to move forward with repair, the correct next step depends on what options your Service Detail currently presents. The platform will show only the actions that apply to your stage.
The key takeaway: we can explain what you’re seeing, but the actual decision must be submitted in the Service Detail so it’s recorded properly.
Accepting a Disposition Offer
The “I’m choosing the alternate ending” button—only available at the right moment.
What this covers
This section explains what a disposition offer is, how it relates to a buyout offer, the timing/eligibility conditions, and where to accept it in your Service Detail.
Disposition vs buyout (same lane, different destination)
Disposition and buyout offers are closely related: both are “alternative paths” you can choose instead of continuing the standard repair/payment flow.
The difference is the payout:
- Disposition offer: typically a $0 option (you’re choosing the disposition path without receiving a buyout amount)
- Buyout offer (when available): includes some amount offered to you
So: same idea (alternate path), different math (zero vs money).
When you can accept (the conditions that matter)
This is the big one—timing is everything:
- ✅ You can accept a disposition/buyout offer after the device has been received (checked in) and before payment is completed.
- ❌ If the device hasn’t been received yet, you generally won’t be able to accept it.
- ❌ If you’ve already completed payment, the option may be grayed out or not available.
If you’re staring at a grayed-out button thinking “is this a personal attack?” — it’s not. It just means your Service Detail isn’t in an eligible state for that option.
Where to accept it
If eligible, you’ll accept it inside your Service Detail, usually under the Actions tab:
Open your Service Detail
Click Actions
Select Accept disposition offer (or Accept buyout offer, when available)
Confirm your choice
Only the customer can complete this action — Help Desk can guide you, but we can't click it for you.
“Optional buyout when available” (what that means in practice)
Not every repair will show a buyout option, and it won't be available at every stage. If a buyout is available for your Service Detail, you'll see it as an option you can choose (again—only when eligible).
If you don’t see it, it’s not currently available. If you see it but it’s disabled, it’s not currently eligible.
How To File a Claim
When something’s not behaving and you want us to take another look—no documentary filmmaking required.
What this covers
This section explains how to file a claim through your Service Detail, what information to include, and what happens after you submit the claim—without requiring video evidence.
When a claim applies
Claims are tied to successful repairs and are available within the guarantee window shown for your service (often 90 or 180 days from delivery, depending on your timeline).
Your Service Detail is the best place to confirm what applies to your specific repair record.
Where to file the claim
You file the claim directly inside your Service Detail.
Look for File A Claim (typically under the Actions tab when it's available). If you don’t see it, the claim option isn’t currently available for that Service Detail.

What to include (simple, helpful, no video needed)
We don’t require video evidence anymore. We’ll take your description at face value and evaluate the device on the bench.
When you file the claim, include:
- what the device is doing (exact symptom)
- when it happens (every time, intermittent, after warm-up, under load, etc.)
- anything that triggers it (button press, movement, specific cable/accessory)
- anything you already tried
Think “clear and specific,” not “epic saga.” (Unless it truly is an epic saga. Then: bullet points.)
What happens after you file the claim
Once the claim is submitted:
-
the claim remains tied to the same Service Detail reference
-
we coordinate next steps through that Service Detail
-
if the technician needs the device back for evaluation, we'll provide the official return instructions through the workflow
After the device is checked in again (when return is needed), updates and evaluation progress continue in the Service Detail.
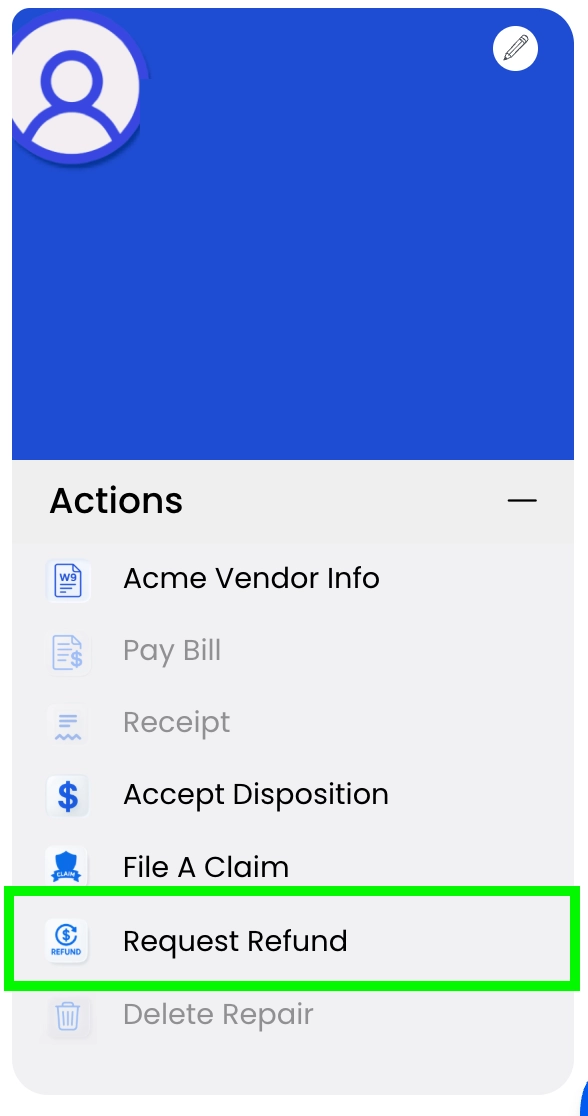
Requesting a Refund
When the outcome wasn’t what anyone wanted, and you’re ready to hit the official “refund, please” button.
What this covers
This section explains where to request a refund, when the refund option becomes available, and what to expect after you submit the request.
When you can request a refund
The “Request Refund” option is conditional—meaning it only shows up when it applies.
In general, it becomes available when:
- the repair result is unsuccessful, and
- the device has been returned and delivered back to you
That timing is intentional: it prevents refund requests from being submitted mid-transit, mid-process, or while the device is still in limbo doing its best impression of a missing sock.
If you don’t see the option, it means the request isn’t available for that Service Detail at that moment.
Where to request a refund
You’ll request it directly in your Service Detail, typically under the Actions tab.
Look for:
- Request Refund
Then follow the prompts shown there.
Important: refund requests must be submitted by the customer inside the Service Detail (the Help Desk can guide you, but we can’t submit the request for you).
What a refund request actually does
Submitting a refund request is the formal trigger that tells our team:
- you’ve received the device back, and
- you’re requesting the refund path that applies to your outcome
From there, the next steps and status will continue to live in the Service Detail so everything stays documented in one place.
A quick expectation-setter (no mystery math)
Refund handling depends on the repair path and what was performed, but the guiding principle is simple:
If the repair attempt was unsuccessful, the process reflects the outcome and any applicable refund handling—while keeping the service record consistent in the Service Detail.
(Translation: we don’t do “surprise policies”—if it applies, your Service Detail will show the appropriate option.)
Additional Repair Claim Process
When your device comes back for a sequel—and we run it through the same official record.
What this covers
This section explains what happens after an additional repair claim is initiated, how the device is brought back into evaluation when needed, and where all updates and next steps live.
An additional repair claim is handled under your existing Service Detail—no new submission required.
That’s intentional: it keeps the entire repair history (original service + claim activity) in one place, so nothing gets lost across multiple tickets or links.
Depending on what’s reported and what the Service Detail shows, we may request additional context to help the technician bench reproduce the issue.
Key point: requirements can vary, and the Service Detail will show what’s needed for your specific situation. (We avoid one-size-fits-all requirements because devices love to be... unique.)
If the technician bench needs the device back to evaluate the claim, we’ll coordinate return steps through the official workflow tied to your Service Detail.
Once the device is received and checked in, the Service Detail reflects that it’s back in an evaluation cycle and updates continue there.
After the device is re-evaluated, the next steps—rework, a new quotation (if needed), or a resolution decision—are posted to the Service Detail.
Everything stays documented and traceable under the same reference number.
Additional Repair Claim Outcomes
The “okay, what happens after the sequel?” portion of the story.
What this covers
This section explains the most common outcomes after a device returns for additional evaluation under a repair claim, and what each outcome means for next steps.
Outcome 1: Covered rework (the “we’ve got this” outcome)
If the additional evaluation shows the issue is tied to the work previously performed, the technician group will proceed with rework under the same Service Detail reference.
What this generally means for you:
- the repair continues under the same record
- you won’t be asked to start a new submission
- return shipping related to the claim path is handled as part of getting the unit back to you
This is the best-case “yep, we see it, we’re correcting it” scenario.
Outcome 2: New issue discovered (the “plot twist, different villain” outcome)
Sometimes the device is failing again, but for a reason that wasn’t part of the original repair scope.
If the additional evaluation shows it’s a new or unrelated defect, you may see a new quotation posted to your Service Detail.
What this generally means:
- you’ll review the new quote and decide how to proceed
- any official response is completed inside the Service Detail (as usual)
It’s not uncommon for older devices to have more than one weak point—electronics can be... ambitious like that.
Outcome 3: Determined unsuccessful (the “we tried everything reasonable” outcome)
If the additional evaluation determines that the original service was unsuccessful and cannot be corrected, the resolution may be a refund for the service portion (excluding shipping or parts).
What this generally means:
- the Service Detail will document the determination and next steps
- refund handling follows what’s shown/available in your Service Detail
Not the outcome anyone hopes for, but it’s the clean, transparent resolution when a device just refuses to cooperate.
How Quotations Are Calculated
Where the number comes from (and why it isn’t “whatever feels right today”).
What this covers
This section explains how quotations are generated under the legacy evaluation workflow, what inputs drive the quote, and what the quote represents (without repeating “how to respond” or other quotation topics).
The legacy model: evaluate first, then quote
Acme’s current quoting flow follows the legacy evaluation model:
-
the device is evaluated on the bench
-
the technician documents findings
-
a single quotation is posted to your Service Detail for approval
So the quote is not generated from a generic price list or an email description alone—it’s based on what the technician actually finds during evaluation.
What goes into the quotation (high-level inputs)
A quotation is calculated from the real work required to attempt the repair, based on things like:
- The reported symptom (what you submitted as the problem)
- What the technician can confirm on the bench (observed behavior and test results)
- Repair complexity (how deep the fault is and what's required to address it)
- Required components/parts (what’s needed to attempt the fix, if applicable)
- Verification needs (what testing is required to confirm functionality)
And a key reality of repair work still applies:
Diagnostics and repair are not mutually exclusive — it usually requires extensive diagnostic work for brief moments of repair.
So the quote reflects the full effort to pursue a reliable outcome, not just the final “swap” moment.
What the quotation represents
The quotation is the defined, all-in cost to proceed with the repair attempt under the legacy workflow. It’s meant to be a complete authorization amount, not a running tab that changes as someone discovers new feelings.
If your repair requires your decision, the Service Detail will present the quotation and the official response options.
Where the number comes from (in one sentence)
The number comes from the technician's evaluated findings plus the defined scope of work required to attempt the repair and verify it—captured as one quotation in your Service Detail.
Understanding Your Quotation
The difference between “a real number” and “a hopeful guess.”
What this covers
This section explains how to read a quotation, what it includes (work + required parts), and how a quotation differs from a ballpark estimate discussed before a device is evaluated.
Ballpark estimate vs quotation (don’t let the names blur)
These two sound similar, but they’re very different tools:
A ballpark estimate is a non-binding guess discussed before the device is evaluated. It’s meant to help you decide whether it’s worth submitting the device at all.
It’s useful for planning, but it’s not official and it’s not final.
A quotation is a binding, exact number posted after the technician evaluates the device. It’s the official price to proceed with the attempted repair work.
If you want the “real number,” the quotation is it.
What your quotation includes
A quotation is built around two big buckets:
1) The work (the bench reality)
This includes the full repair effort required to pursue the outcome based on what was found during evaluation—diagnosing, correcting, and verifying.
And yes, the classic truth applies:
Diagnostics and repair are not mutually exclusive — it usually requires extensive diagnostic work for brief moments of repair.
2) Required parts (when applicable)
If the repair requires parts, the quotation accounts for what’s needed to attempt the repair as scoped.
No “parts are separate later” guessing game. The quotation is intended to represent the complete cost to proceed with the attempted work.
What a quotation does not guarantee
A quotation is not a promise that the device will be successfully repaired.
What it does guarantee is:
- the technician will perform the service attempt within the quoted scope, and
- the process will reach a clear outcome (successful or unsuccessful) documented in your Service Detail.
Sometimes devices cooperate. Sometimes they choose chaos. The quote covers the attempt—not the device’s willingness to be revived.
If the repair attempt is unsuccessful (refund expectations)
If a repair is attempted and the outcome is unsuccessful, most of the cost is typically refunded—with important exceptions reflected in your Service Detail.
In the quote-based workflow, the common rule is:
- the $35 Network Technician Fee is not refunded, and
- return shipping may not be refunded (because the device still has to make the trip back to you)
Your Service Detail is the official source for the exact breakdown of what is refunded in your case.
Network Fees
The “keeping the repair network running” fee—aka the one fee that isn’t a mystery, even if the device is.
What this covers
This section explains what the $35 Network Technician Fee is, when it applies, when it doesn’t, and how it relates to successful vs unsuccessful outcomes.
What the $35 Network Technician Fee is
The $35 Network Technician Fee is a fixed network facilitation fee tied to approved repairs under the quotation-based workflow.
It’s not an hourly charge, and it’s not a “diagnostic labor” add-on. It exists to support the technician network operations that make the repair possible.
Think of it as the toll to enter the repair highway—once you approve the repair path.
When it applies
The $35 Network Technician Fee applies when the customer approves the quote (i.e., authorizes the repair under the quotation-based flow).
Key detail: diagnostics and repair aren’t treated as separate phases you can approve independently—approval authorizes the overall repair effort.
When it does not apply
The fee does not apply if you decline the quote.
In that scenario, the only cost you owe is return shipping (or you can provide your own UPS label), based on what your Service Detail shows.
What happens if the repair is unsuccessful
If a repair is attempted but ultimately unsuccessful, the policy is:
- all other fees are refunded except the $35 Network Technician Fee
It’s the one consistent fee that remains when the outcome isn’t successful.
No one loves this moment, but it’s at least predictable—and your Service Detail documents it.
Return shipping Fees
The “getting it back to you” cost—only when it isn’t already included.
What this covers
This section explains when return shipping fees apply, what the standard return shipping fee is, and what alternatives you have if you want to handle return shipping yourself.
When return shipping fees apply
Return shipping fees mainly show up when you don’t proceed with the repair after a quote is posted.
In the quote-based workflow:
- Approve the quote: return shipping is included as part of the service flow
- Decline the quote: return shipping is $35
No surprise math—just two lanes.
The standard return shipping fee
If return shipping isn’t included, the standard return shipping fee is $35.
Your Service Detail will show the exact amount due and the payment prompt when it applies.
If you want to use your own label
If you decline the quote, you can also choose to provide your own UPS label instead of paying the $35 return shipping fee.
This is especially useful if you:
- have a corporate UPS account
- need a specific shipping speed
- want to manage the return shipment directly
Where to confirm your exact situation
Return shipping fees and options are always reflected in your Service Detail, since that’s where your repair’s pricing path and current stage are documented.
If you’re ever unsure whether return shipping is included or due, the Service Detail will tell you without requiring any guesswork.
Administrative Fees
The “we can’t keep your device in limbo forever” fee—aka storage mode kicking in.
What this covers
This section explains how much the administrative fee is, when it applies, and where you’ll see it reflected (so you never have to guess).
How much is the administrative fee?
The defined administrative fee in the workflow is:
- $85 Administrative fee
This fee is tied to the “device is still here and unpaid” scenario, not to bench work or diagnostics.
When it applies
The $85 administrative fee applies when:
- A quote has been published, and
- A balance remains unpaid for 15 days
At that point (Day 15), two things happen together:
- Your Service Detail status changes to Unclaimed Device Pending
- The $85 administrative fee is added
Where you’ll see it
You’ll see the fee directly in your Service Detail, in the same area where costs/amounts due are shown.
No separate invoice. No surprise email attachment. The Service Detail is the official record.
What happens if it keeps going unpaid
This is the part nobody wants, but everyone appreciates being told clearly:
- Day 15: Unclaimed Device Pending + $85 admin fee
- Day 30: device is considered abandoned and can no longer be reclaimed (any remaining balance is removed/waived, and Acme may dispose of or retain the device)
Yes, it’s strict. It’s also how we prevent a warehouse full of “I’ll pay next week” devices from becoming an electronics museum.
Acme: The Technician Network
Not one shop. Not a call center. More like a distributed “bench brain” that routes your device to the right humans.
What this covers
This section explains what the technician network is, how it connects to the repair submission journey, and why technician assignment is driven by the information you provide (yes—by an algorithm/function, kind of like a "neural network of sorts").
What the technician network is
Acme Revival is a distributed network of independent technicians working from dedicated, non-public workspaces—labs, workshops, and benches set up for hands-on electronics repair.
So instead of one central store where every device lands in the same pile, Acme operates as a routed network:
- repairs come in digitally through the submission journey
- devices ship to the assigned bench
- the repair is executed and tracked through the platform
It’s “online intake + real-world bench work,” stitched together by a system that keeps everything organized.
How the network connects to the submission journey (and why it matters)
When you submit a repair, you’re not just “starting a ticket.” You’re providing the data that makes the technician network function.
Your submission details help the system answer questions like:
- What is this device, really?
- What kind of failure is being reported?
- What level of complexity might this be?
- Which technician bench is best suited and currently available?
That’s why the submission journey matters: it’s the routing input that helps the network place your device on the right bench, faster and more accurately.
In other words: the better the intake, the smarter the match.
Technician assignment: algorithm/function-driven routing
Technician assignment isn't random and it isn't “whoever raised their hand first.” It’s based on what you submit, using an internal assignment logic—think an algorithm/function, a “neural network of sorts”—that routes repairs based on fit and availability.
That system uses your submission info to make a best-match assignment so:
- the technician bench has the right capabilities for the job
- the repair is less likely to bounce around
- the workflow stays consistent and trackable
No, it’s not a sci-fi robot technician. It’s more like smart routing with a goal: the right repair goes to the right bench.
Why this model is a big deal
The network exists to handle repairs that traditional repair shops and manufacturers often won’t touch—especially devices that are unsupported, discontinued, niche, or inconvenient to service locally.
A distributed model helps because:
- a wider range of bench skills can be matched to devices
- repairs aren’t limited by one store’s equipment or staff
- the platform keeps the process structured across many technicians
It’s basically “repair without the ‘sorry, we don’t service that’ script.”
Certifications
Because “trust us, we’re good at this” hits different when you can point to something official-ish.
What this covers
This section explains how to think about “certifications” in a distributed technician network, what we can and can’t promise universally, and where to look for the most reliable proof of what happened on your repair.
Certifications in a technician network (the honest version)
Acme Revival is a network of technicians—not a single storefront where every tech has the exact same badge on the exact same lanyard.
So when customers ask about certifications, the right way to frame it is:
- some technicians have formal certifications
- some have specialized training or long bench experience
- what matters most is the documented repair work and outcomes tied to your Service Detail
Translation: credentials can be a helpful signal, but the repair record is the receipt.
What we do stand behind (regardless of acronyms)
Even if two technicians don’t share the same certification list, your repair still follows a consistent process:
- your repair is tracked through the Service Detail
- evaluations and updates are documented
- quotes/approvals happen through official Service Detail actions
- outcomes are posted clearly
And for successful repairs, the guarantee window shown for your service (90 or 180 days from delivery, depending on your timeline) applies.
What we avoid promising
We avoid blanket claims like “every technician has X certification,” because that’s not how a network model works—and we don’t want to oversell.
Also, we don’t treat certifications as a shortcut to certainty. Electronics repair is still real-world troubleshooting, not a “scan badge → device fixed” system (sadly).
If a customer needs documentation for an institution
If the reason behind the certification question is “my company needs vendor paperwork,” the best place to point them is the Vendor Details (PDF) in the Actions tab of the Service Detail (when available). That packet contains our standard vendor documentation (like W9 and banking info).
(And no—we don’t fill out external vendor forms or accept binding PO terms. We keep it clean and standardized.)
Traceability
The behind-the-scenes reason we can trust the numbers coming off the bench.
What this covers
This section explains traceability as a calibration concept (the “traceability stack”), identifies the traceability point in Acme’s workflow, and outlines a practical traceability plan for a distributed technician network.
What traceability means (calibration + “traceability stack”)
In repair work, a lot hinges on measurements: voltages, resistance, current draw, signal behavior, and whether something is “within spec” or “absolutely not.”
Traceability means those measurements are credible because the instrument making them is part of a calibration chain:
- the instrument is calibrated/verified against a known reference
- that reference is tied to a higher-level reference
- and so on up the chain
That chain is the traceability stack—the reason a measurement is something you can rely on, not something you argue about like a blurry photo.
The traceability point (where Acme’s trust lives)
In Acme’s model, the traceability point isn’t a single “Acme headquarters calibration lab.” It’s each technician bench.
That means the trust boundary is:
- the measurement instruments used by the assigned technician
- their calibration status
- their ability to verify calibration upon request
So the “traceability point” is the moment a technician uses calibrated measurement equipment to diagnose and verify your device—and that credibility is maintained through periodic calibration and verification.
What Acme expects from technicians (contractually)
Technicians are expected to:
- verify calibration upon request, and
- ensure measurement tools are calibrated (or have them calibrated) at least every 12 months
In other words: “We can prove our tools are within calibration,” and “We keep that proof current.”
A practical traceability plan for Acme’s technician network
Here’s a traceability plan that matches a distributed network reality while keeping standards meaningful (and not turning technicians into full-time paperwork managers).
1) Define which tools require traceability (bench calibration list)
Each technician maintains a simple inventory of measurement-critical tools, such as:
- electrical measurement instruments used for diagnostics/verification
- any specialized measurement devices that directly affect pass/fail decisions
This prevents “everything must be certified” chaos and focuses on what actually affects measurement trust.
2) Enforce a calibration interval (minimum: 12 months)
Each technician ensures measurement-critical tools are
- within their calibration window, and
- recalibrated/re-verified at least every 12 months.
This can be done by professional calibration services or approved verification methods—what matters is the tool remains within a defined calibration period.
3) Maintain proof that can be produced on request
Technicians must be able to verify calibration upon request—meaning they can confirm the instrument is within its calibration period and provide supporting confirmation where applicable (certificate, record, or verification log).
This is the “show your work” layer of the traceability stack.
4) Add spot verification triggers (when reality looks weird)
If something happens that could compromise confidence (example triggers):
- readings are inconsistent across tests
- results don’t match expected behavior
- the instrument experiences damage or abnormal behavior
…then the instrument should be checked/verified before it’s trusted for further diagnosis.
Because the fastest way to waste a day is to chase a fault that was actually a lying instrument.
Why customers should care (in a good way)
Traceability is how we avoid:
- false conclusions from inaccurate measurements
- inconsistent outcomes between benches
- “it passed testing” claims that aren’t grounded in reliable instrumentation
It’s invisible when it’s done right… which is kind of the point.
5) Keep it auditable without being painful
A lightweight approach works best for a network:
- inventory list + calibration dates
- annual renewal reminders
- request-based proof availability
The goal is confidence and consistency—not a novel-length binder.
Why customers should care (in a good way)
Traceability is how we avoid:
- false conclusions from inaccurate measurements
- inconsistent outcomes between benches
- “it passed testing” claims that aren’t grounded in reliable instrumentation
It’s invisible when it’s done right… which is kind of the point.
Device Abandonment / Unclaimed Device Proceeding
The part of the process where “I’ll deal with it later” turns into “later has consequences.”
What this covers
This section explains the unclaimed/abandonment timeline (based on quotation), what happens at day 15 and day 30, and how to avoid reaching either milestone.
The clock starts at the quotation
This is the most important detail:
- ✅ The timeline begins when your quotation is published.
- ❌ It is not based on when an outcome is published.
So if you’re ever asking “when did the countdown start?” — look at the quotation date in your Service Detail.
Day 0–15: your decision window
From the quotation date, you have 15 days to take the required next step shown in your Service Detail if you want to see your device again.
This is the "make a plan" window:
- decide what you want to do
- follow the option presented in your Service Detail
- don’t wait until day 14 at 11:59 PM and then blame your calendar
(Your calendar is innocent. It was trying its best.)
Day 15: unclaimed device proceeding + $85 administrative fee
If the device remains unclaimed after 15 days from the quotation date, it enters an unclaimed device proceeding.
At that point, an $85 administrative fee is added.
Important: this is an administrative fee, not a “storage” fee. It reflects the extra coordination and overhead involved when the device is being held longer than the standard workflow timeline.
Day 30: device abandonment
If the device remains unclaimed for 30 days from the quotation date, it is considered abandoned.
Once abandoned:
- the device can no longer be reclaimed
- the Service Detail reaches an end-of-process state for that device
It’s the system’s way of preventing devices from living in permanent limbo.
How to avoid this (easy mode)
-
Watch for the quotation in your Service Detail
-
Act within 15 days of the quotation date if you want the device back in your hands
-
If you’re unsure what option to choose, email us before the deadline — we’ll help you interpret what you’re seeing